php-fpm和easyswoole性能简单对比

条件说明 自己用的mac开发电脑,电脑还装了很多软件并在运行,但是swoole和php-fpm都在这运行,所以是公平的

swoole使用easyswoole框架

php-fpm 使用laravel框架

php-fpm配置: max_requests=204800 max_children=100000 start_servers=100 max_spare_servers=1000 min_spare_servers100

nginx配置: worker_processes =4 worker_connections=100000

使用Mac自带的ab工工具,请求数10000,并发100

php-fpm结果

wukeyan$ ab -n 15000 -c 100  http://auction.com/api/site/auction/getBeatIng
This is ApacheBench, Version 2.3 <$Revision: 1826891 $>
Copyright 1996 Adam Twiss, Zeus Technology Ltd, http://www.zeustech.net/
Licensed to The Apache Software Foundation, http://www.apache.org/

Benchmarking auction.com (be patient)
Completed 1500 requests
Completed 3000 requests
Completed 4500 requests
Completed 6000 requests
Completed 7500 requests
Completed 9000 requests
Completed 10500 requests
Completed 12000 requests
Completed 13500 requests
Completed 15000 requests
Finished 15000 requests


Server Software:        nginx/1.17.3
Server Hostname:        auction.com
Server Port:            80

Document Path:          /api/site/auction/getBeatIng
Document Length:        72 bytes

Concurrency Level:      100
Time taken for tests:   199.363 seconds
Complete requests:      15000
Failed requests:        0
Total transferred:      4485000 bytes
HTML transferred:       1080000 bytes
Requests per second:    75.24 [#/sec] (mean)
Time per request:       1329.084 [ms] (mean)
Time per request:       13.291 [ms] (mean, across all concurrent requests)
Transfer rate:          21.97 [Kbytes/sec] received

Connection Times (ms)
             min  mean[+/-sd] median   max
Connect:        0    0   0.4      0      28
Processing:    98 1327 109.4   1333    1745
Waiting:       95 1327 109.5   1333    1745
Total:         98 1327 109.4   1334    1745

Percentage of the requests served within a certain time (ms)
 50%   1334
 66%   1375
 75%   1399
 80%   1415
 90%   1460
 95%   1493
 98%   1529
 99%   1558
100%   1745 (longest request)
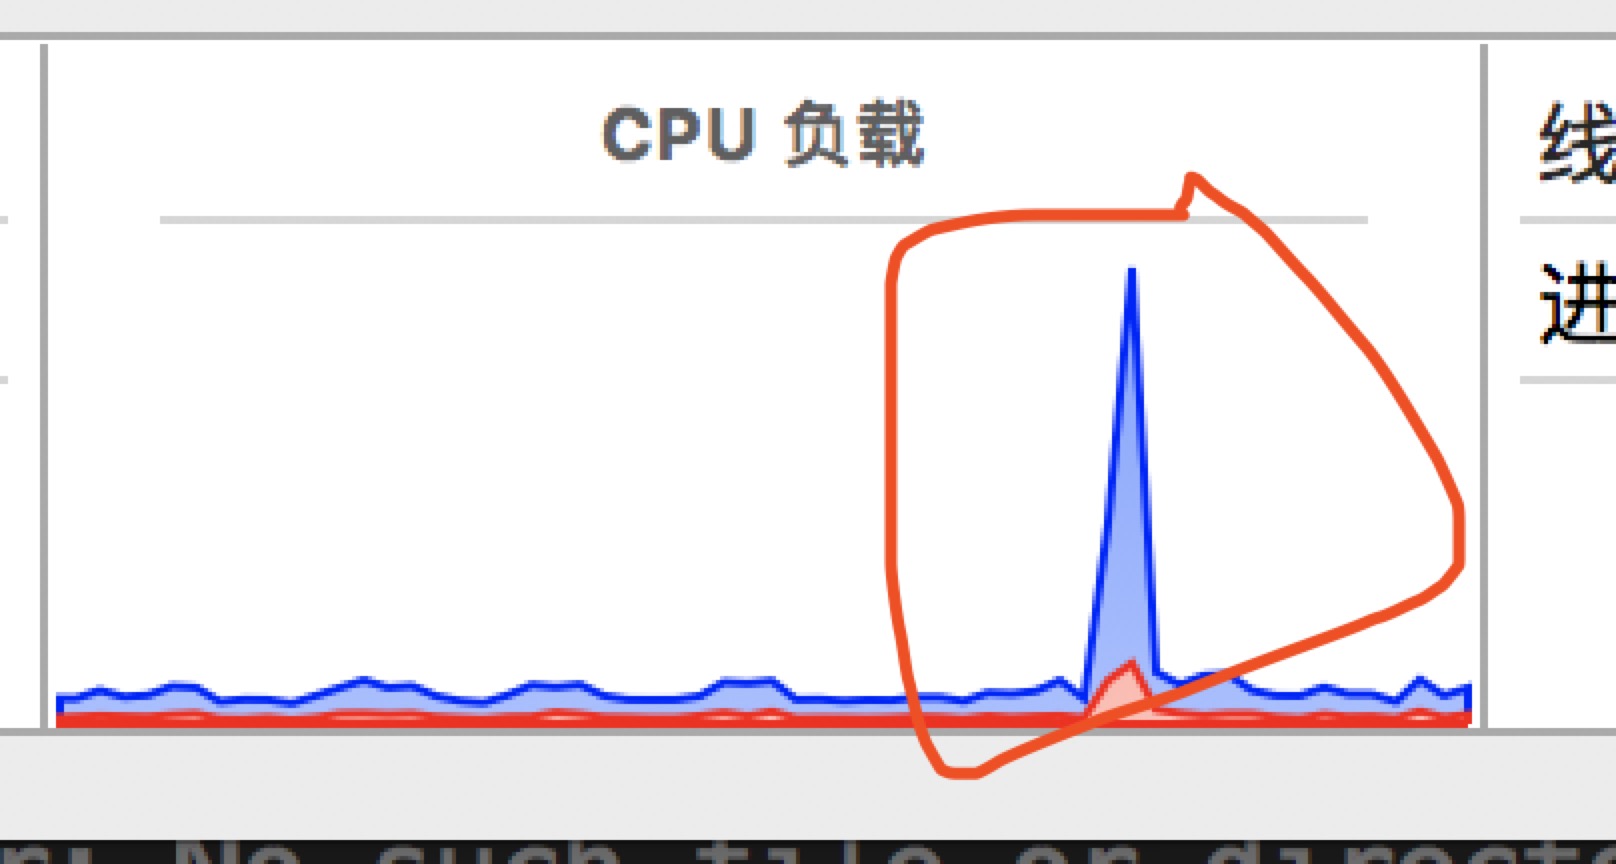
cpu情况

https://dawnkeyan.github.io/images/php-fpm_spu.jpeg

swoole结果

wukeyan$ ab -n 15000 -c 100  http://127.0.0.1:9502/common/test
This is ApacheBench, Version 2.3 <$Revision: 1826891 $>
Copyright 1996 Adam Twiss, Zeus Technology Ltd, http://www.zeustech.net/
Licensed to The Apache Software Foundation, http://www.apache.org/

Benchmarking 127.0.0.1 (be patient)
Completed 1500 requests
Completed 3000 requests
Completed 4500 requests
Completed 6000 requests
Completed 7500 requests
Completed 9000 requests
Completed 10500 requests
Completed 12000 requests
Completed 13500 requests
Completed 15000 requests
Finished 15000 requests


Server Software:        EasySwoole
Server Hostname:        127.0.0.1
Server Port:            9502

Document Path:          /common/test
Document Length:        14 bytes

Concurrency Level:      100
Time taken for tests:   1.029 seconds
Complete requests:      15000
Failed requests:        0
Total transferred:      2310000 bytes
HTML transferred:       210000 bytes
Requests per second:    14571.86 [#/sec] (mean)
Time per request:       6.863 [ms] (mean)
Time per request:       0.069 [ms] (mean, across all concurrent requests)
Transfer rate:          2191.47 [Kbytes/sec] received

Connection Times (ms)
             min  mean[+/-sd] median   max
Connect:        0    3   0.5      3       6
Processing:     1    3   0.5      3       6
Waiting:        0    3   0.5      3       6
Total:          4    7   0.9      6      11
WARNING: The median and mean for the total time are not within a normal deviation
       These results are probably not that reliable.

Percentage of the requests served within a certain time (ms)
 50%      6
 66%      7
 75%      7
 80%      8
 90%      8
 95%      9
 98%      9
 99%     10
100%     11 (longest request)
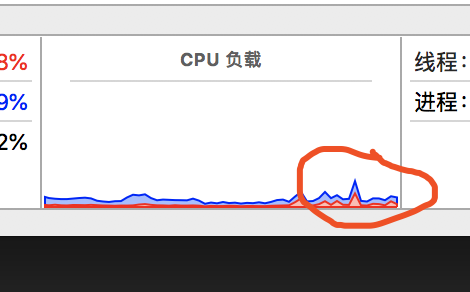
cpu情况

https://dawnkeyan.github.io/images/swoole_spu.png

swoole100%都是11毫秒内完成,每秒可服务14571个请求,cpu使用接近100%

php-fpm 都是在1秒以上完成的,每秒可服务75个请求,cpu使用平时是10%左右,压测的时候%17左右

php有些加法和乘法会变无限循环小数

因为系统的二进制在存储某些数据的时候,二进制可能是无限的,所以就导致加减法和乘法会变无限循环小数的问题

//实验在php 7.2下进行
var_dump(0.58 * 100);//这种情况不会有问题
var_dump(json_encode(['a' => 0.58 * 100]));

float(58)
string(23) "{"a":57.99999999999999}"

解决办法是使用更高精度的函数

var_dump(json_encode(['a' => bcmul(0.58, 100)]));
string(10) "{"a":"58"}"

bcadd — 将两个高精度数字相加

bccomp — 比较两个高精度数字,返回-1, 0, 1

bcdiv — 将两个高精度数字相除

bcmod — 求高精度数字余数

bcmul — 将两个高精度数字相乘

bcpow — 求高精度数字乘方

bcpowmod — 求高精度数字乘方求模,数论里非常常用

bcscale — 配置默认小数点位数,相当于就是Linux bc中的”scale=”

bcsqrt — 求高精度数字平方根

bcsub — 将两个高精度数字相减

PHP strtotime 加减一个月bug解决

strtotime('-1 month',strtotime('2011-3-31')); 当31好的时候减一个月的时候,就是前一个月的31号,但是有些月份没有31号,就会往后下一个月移,就乱了

old日期可以减一个月或者加一个月的第一天,然后再把old的日期的天拼到新日期,在和新日期的最后一天比较,如果小于拼接的,就取最后一天,否则就取拼接的

if (!function_exists('calculate_month')) {
   /**
    * 对月进行加减
    * @param int $date 时间戳
    * @param string $algorithm 比如 +1 month 或者-1 month
    * @return string
    */
   function calculate_month(int $date, string $algorithm): string
   {
       $day = date('d', $date);
       $newDateFirst = date('Y-m', strtotime('first day of ' . $algorithm, $date));
       $newDate = $newDateFirst . '-' . $day;
       $newDateLast = date('Y-m-d', strtotime('last day of ' . $algorithm, $date));
       return $newDateLast < $newDate ? $newDateLast : $newDate;

   }
}
var_dump(calculate_month(strtotime('2020-05-31'),'-3 month'));
var_dump(calculate_month(strtotime('2020-08-31'),'+1 month'));
var_dump(calculate_month(strtotime('2020-08-15'),'+1 month'));

string(10) "2017-02-28"
string(10) "2017-09-30"
string(10) "2017-09-15"

python工具nikola通过rst文档生产博客网页传到github访问

由于mac会有python版本乱套问题,所以直接在python3 docker里安装部署

安装nikola
pip install "git+https://github.com/getnikola/nikola#egg=Nikola[extras]"
git clone https://github.com/getnikola/nikola

cd nikola

pip install -e ".[extras]"

初始化项目
nikola init --demo <directory_name>.
生成文章
nikola new_post -e.

然后编辑文章

构建
nikola build
启动服务浏览器访问
nikola serve --browser

可以根据喜好编辑conf.py

然后在github建个项目 git名称.github.io

clone到本地把Nikola项目拷在这 执行nikola build的目录的父目录,再把output里的全部目录拷到git项目的根目录

mac安装impyla thriftpy失败

Command "/usr/local/opt/python/bin/python3.7 -u -c "import setuptools, tokenize;__file__='/private/tmp/pip-install-ocg0pik5/thriftpy/setup.py';f=getattr(tokenize, 'open', open)(__file__);code=f.read().replace('rn', 'n');f.close();exec(compile(code, __file__, 'exec'))" install --record /private/tmp/pip-record-2agxxtar/install-record.txt --single-version-externally-managed --compile" failed with error code 1 in /private/tmp/pip-install-ocg0pik5/thriftpy/

mac python Failed building wheel for thriftpy

解决办法:pip3 install cython thriftpy

安装python框架falcon

docker run -v $PWD/myapp:/usr/src/myapp -it --rm -p 8000:8000 -w /usr/src/myapp python:3.5 bash 安装python和pip

$ pip install falcon

$ mkdir look $ cd look

$touch app.py import falcon api = application = falcon.API()

$ pip install gunicorn

$ gunicorn -b 0.0.0.0:8000 app(默认是127.0.0.1:8000,这样的话只有主机可以访问)

$ curl localhost:8000 -v

$ pip install --upgrade httpie

$ http localhoost:8000

pip install msgpack-python

$ http GET localhost:8000/images

php把数据转成csv传到solr

$field = ['Peter','Griffin','Oslo','Norway','id'];
$data = [
                  ['Peter'=>43,'Griffin'=>4,'Oslo'=>32,'Norway'=>23,'id'=>1],//主键值必须有,比如这id等于1
                  ['Peter'=>43,'Griffin'=>5,'Oslo'=>32,'Norway'=>23,'id'=>12],
                  ['Peter'=>43,'Oslo'=>32,'Norway'=>23,'id'=>51],
                  ['Peter'=>43,'Griffin'=>6,'Oslo'=>32,'Norway'=>23,'id'=>31],
              ];
$core = 'test_update';
$csv_result = [$field];

      //处理数据,给不存在的值赋空值,不然CSV行列不对应
      foreach ($field as $files_value){
          foreach ($data as $data_key=>$data_value){
              $csv_result[$data_key+1][$files_value] = $data_value[$files_value];
          }
      }


      $file_name = time().$core.rand().'.csv';

      $file = fopen($file_name,"w") or exit("Unable to open file!");;

      foreach ($csv_result as $line)
      {
          $line = implode(',',$line);
          fputcsv($file,split(',',$line));
      }
      fclose($file);

      //获取当前的路径
      exec('pwd',$address);

      //上传到solr
      exec('curl http://127.0.0.1:8984/solr/'.$core.'/update?commit=true --data-binary @'.$address[0].'/'.$file_name.' -H \'Content-type:text/csv; charset=utf-8\'',$result);
      //删除生成的文件
      unlink($file_name);
      $result = implode('',$result);

      //上传成功
      if(strpos($result,'<int name="status">0</int>')){
          return ['status'=>true];
      }
      else{//上传失败
          //存日志到mongo
          $MongoModel = new MongoModel('集合', '', 'DB_MONGO');
          $MongoModel->add(['core'=>$core,'msg'=>$result,'field'=>$field,'data'=>$data]);
          return ['status'=>false,'msg'=>$result];
      }在这里书写你的文章。

centos搭建PHP环境

操作系统: CentOS 7.4 64位

创建组和账号

groupadd 组名 useradd -g 组名-s /bin/bash 账号 nginx(1.14.0)

https://nginx.org/en/linux_packages.html#stable

vim /etc/yum.repos.d/nginx.repo

[nginx] name=nginx repo baseurl=http://nginx.org/packages/centos/7/$basearch/ gpgcheck=0 enabled=1 sudo yum install nginx

站点配置文件位置 /etc/nginx

mysql(5.6.4)

yum install mysql mysql-devel mysql-server

但是centost 安装mysql-server 会找不到包

办法:官网下载安装mysql-server

wget http://dev.mysql.com/get/mysql-community-release-el7-5.noarch.rpm

rpm -ivh mysql-community-release-el7-5.noarch.rpm

yum install mysql-community-server

安装好后重启 service mysqld restart

进入mysql mysql -u root

设置root密码

set password for 'root'@'localhost' =password('xxxx');

修改配置文件

vim /etc/my.cnf

进入mysql

创建中小学账号 CREATE USER 'user'@'%' IDENTIFIED BY 'password'; (%可访问IP,%表示全部可访问)

创建数据库 create database 数据库名

授权账号数据库 grant all privileges on 数据库名.* to 账号@'%' identified by '密码';

刷新系统权限表 flush privileges;

可以使用的Navicat传输数据

mongo(3.6.x)

https://docs.mongodb.com/manual/tutorial/install-mongodb-on-red-hat/index.html

vim /etc/yum.repos.d/mongodb-org-3.6.repo

[mongodb-org-3.6] name=MongoDB Repository baseurl=https://repo.mongodb.org/yum/redhat/$releasever/mongodb-org/3.6/x86_64/ gpgcheck=1 enabled=1 gpgkey=https://www.mongodb.org/static/pgp/server-3.6.asc yum install -y mongodb-org

配置文件位置/etc/mongod.conf

MongoDB默认将数据文件存储在/var/lib/mongo目录,默认日志文件在/var/log/mongodb中。如果要修改, 可以把这两个文件放在空间大的硬盘 ,但是不要修改 /etc/mongod.conf ,我试过无法重启,应该是建软链接。

然后重启mongo

生成软连接

ln -s

相关命令service mongod start|stop|restart

mongo创建账号

use admin

db.createUser(

{

user: "root",

pwd: "密码",

roles: [ { role: "userAdminAnyDatabase", db: "admin" } ]

}

);

创建普通账号

use 数据库

db.createUser(

{

user: "username",

pwd: "password",

roles: [ { role: "readWrite", db: "数据库名" } ]

}

);

修改密码db.changeUserPassword('账号','密码');

还原数据mongorestore -d db 数据库名 数据库文件

卸载yum erase $(rpm -qa | grep mongodb-org)

删除数据库文件和日志文件

PHP(5.6.36)

1.检查当前安装的PHP包

yum list installed | grep php

如果有安装的PHP包,先删除他们

yum remove php.x86_64 php-cli.x86_64 php-common.x86_64 php-gd.x86_64 php-ldap.x86_64 php-mbstring.x86_64 php-mcrypt.x86_64 php-mysql.x86_64 php-pdo.x86_64

2.加载安装包

Centos 5.X

rpm -Uvh http://mirror.webtatic.com/yum/el5/latest.rpm

CentOs 6.x

rpm -Uvh http://mirror.webtatic.com/yum/el6/latest.rpm

CentOs 7.X

rpm -Uvh https://mirror.webtatic.com/yum/el7/epel-release.rpm

rpm -Uvh https://mirror.webtatic.com/yum/el7/webtatic-release.rpm

如果想删除上面安装的包,重新安装

rpm -qa | grep webstatic

rpm -e 上面搜索到的包即可

3.运行yum install

yum install php56w.x86_64 php56w-cli.x86_64 php56w-common.x86_64 php56w-gd.x86_64 php56w-ldap.x86_64 php56w-mbstring.x86_64 php56w-mcrypt.x86_64 php56w-mysql.x86_64 php56w-pdo.x86_64

注:如果想用其他版本。把所有56改成其他的

4.安装php-fpm

yum install php56w-fpm (其他版本对应改掉56)

[root@zhishu /]# whereis php (查看安装路径)

php: /usr/bin/php /usr/lib64/php /etc/php.d /etc/php.ini /usr/share/php /usr/share/man/man1/php.1.gz

5.安装

yum install php56w-bcmath

5.安装mongodb扩展

先执行命令php -m 查看是否已有

mkdir /usr/local/php-mongodb

cd usr/local/php-mongodb/

wget http://pecl.php.net/get/mongo-1.6.12.tgz

tar xvzf mongo-1.6.12.tgz

cd mongo-1.6.12

phpize(如果没有php-devel会报错The php-devel package is required for use of this command. 安装php-devel :yum install php56w-devel)

./configure --with-php-config=/usr/bin/php-config

make && make install

在php.ini文件中添加extension=mongo.so

extension=mongo.so

重启php-fpm或服务器

systemctl restart php-fpm

修改配置

vim /etc/php-fpm.d/www.conf

svn

https://tecadmin.net/install-svn-1-9-on-centos/

vim /etc/yum.repos.d/wandisco-svn.repo [WandiscoSVN] name=Wandisco SVN Repo baseurl=http://opensource.wandisco.com/centos/$releasever/svn-1.10/RPMS/$basearch/ enabled=1 gpgcheck=0 yum -y install subversion

安装Java

下载安装包(也可以使用其他下载文件方式,拷过来的solr里如果已经有了就不用下载),因为认证问题,不能直接wget, 打开此页面 ,勾上Accept License Agreement,然后点击jdk-8u161-linux-x64.rpm,在下载页面获取文件下载地址,比如我本次的是http://download.oracle.com/otn-pub/java/jdk/8u161-b12/2f38c3b165be4555a1fa6e98c45e0808/jdk-8u161-linux-x64.rpm?AuthParam=1519538436_f233fa0ab4a9cba466bec47d360db37a,然后在/down目录下wget此地址。然后再重命名文件 mv jdk-8u161-linux-x64.rpm?AuthParam=1519538436_f233fa0ab4a9cba466bec47d360db37a jdk-8u161-linux-x64.rpm 安装 rpm -ivh jdk-8u161-linux-x64.rpm 配置系统环境变量,在/etc/profile里追加 JAVA_HOME=/usr/java/jdk1.8.0_161 JRE_HOME=$JAVA_HOME/jre CLASSPATH=.:$JAVA_HOME/lib/dt.jar:$JAVA_HOME/lib/tools.jar:$JRE_HOME/lib PATH=$JAVA_HOME/bin:$JRE_HOME/bin:$PATH export PATH JAVA_HOME CLASSPATH 生效配置,并检验结果 source /etc/profile java -version nodejs (8.x)

https://nodejs.org/en/download/package-manager/#enterprise-linux-and-fedora

curl --silent --location https://rpm.nodesource.com/setup_8.x | sudo bash - sudo yum -y install nodejs git (2.x)

通过IUS安装git 最新版

1.安装ius repository

https://ius.io/GettingStarted/

yum install https://centos7.iuscommunity.org/ius-release.rpm

2.安装yum-plugin-replace

https://ius.io/Usage/#installing-ius-packages

yum install yum-plugin-replace

3.安装git2u 替换老的git

yum replace git --replace-with git2u

openvpn(2.4.x)

http://git.dev.backustech.com/apps/wiki/wikis/ubuntu16-%E5%AE%89%E8%A3%85-openvpn-2.4

yum install openvpn

加高效云盘:

1.在阿里云创建云盘,然后挂载云盘

2.登录服务器执行fdisk -l 可以看到刚刚买的硬盘

3.对这块硬盘进行分区 fdisk /dev/vdb(/dev/vdb可能不一样)

4.然后执行fdisk -l 可以看到看到新的分区

5.格式化新分区(使用ext3扩展文件系统)

mkfs.ext3 /dev/vdb1

6.创建挂载目录mkdir data

7.挂载分区到目录

mount /dev/vdb1 /data

8.设置开机自动挂载 vim /etc/fstab

在文件最后加入/dev/vdb1 /data ext3 defaults 0 0

9.然后重启reboot(线上不要随便重启服务器,考虑实际情况可不可以重启)

10.用df就可以看到了

安装crontab

yum -y install vixie-cron

solr删除数据

方法一 在solr页面选择对应的core,然后点击Document然后Document Type选择XML,然后在Document(s)框内填)

<delete><query>*:*</query></delete> #*:*可以改成其他条件
<commit/>

方法二 post 请求http://ip:端口/solr/core/update?wt=json,<query>id:1</query>里的条件可以修改,post参数

<add commitWithin="1000" overwrite="true">
  <delete>
      <query>id:1</query>
  </delete>
  <commit></commit>
</add>

solr导mongo数据流程

1.进入/home/solr/solr-6.6.2(solr安装路径)创建core,比如创建lab_cloud_periodical bin/solr create -c core名 -p 端口号 -force(root用户需要加)

2.导出mongodb csv 比如导出lab,-f是需要放在solr的且此集合有的字段 mongoexport --username 用户名 --password 密码 --type=csv -f _id,title -d 数据库 -c 集合 -o /home/文件名.csv

3.把数据传到solrcurl http://ip:端口号/solr/core/update?commit=true --data-binary @/home/文件名.csv -H 'Content-type:text/csv; charset=utf-8'

问题: 可能执行着会报错,那是solr会给字段定义类型,但你的某些值有不是那个类型,比如给你定义了int,然后你传的值是字符串。解决办法就是去把int改成string,位置在vim /home/solr/solr-6.6.2/server/solr/lab(写core名)/conf/managed-schema,比如这的tid(有些是默认给你设置了时间,但你传入的不是时间格式),这是我遇到的问题,有些配置想改都可以改的。然后重新导入数据,还有就是主键可以重新设置,修改<uniqueKey>id</uniqueKey>

4.如果需要删除数据参考:http://blog.csdn.net/lbf5210/article/details/51207043

5.查询,页面参数解释:http://blog.csdn.net/zhufenglonglove/article/details/51518846 浏览器进入http://ip:端口号/solr

6.目前能弄的mongo实时更新是一个core记录整个库,一个集合一个core不知道咋弄。